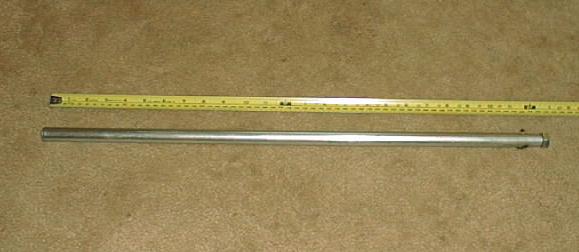
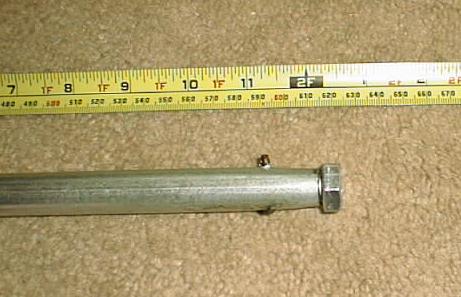
These are the pictures of the tool I made for removing the damper rods in the forks of my 1982 Yamaha Maxim 650 (XJ650J). It was easy and inexpensive to make. I used a 2' long piece of 1/2" electrical conduit, a 12mm bolt with a 19mm head, and a cotter pin. The top of the damper rod is notched to receive a 19mm bolt head and requires holding in order to remove the bottom bolt holding the inner fork tube.
First I lightly hammered the end of the conduit to hold the bolt more securely. Then I drilled the hole through the conduit just above the threads on the bolt. I then drilled the hole through the bolt. I used a drill press, and the most difficult thing was holding the bolt steady on the table. I used a couple drops of fork oil to lubricate the drill bit. After pinning the bolt in the conduit, I wrapped the ends as close to the conduit as possible to avoid scratching the inside of the tube. I had a friend hold the end of the conduit with vise grips while I removed the bottom bolt from the forks with an allen wrench. One required a little light tapping with a hammer to break it loose.
Changing Fork Seals
Prior to tearing the bike apart, order the fork seals, the clips that retain them (you will damage them taking them out & they're cheap), enough fork oil (the '82 Maxim forks use 9.24 oz. of 10 wt. fork oil), and optionally the dust seals. The dust seals are inexpensive, I would recommend replacing them. You also might want to get the circlips that retain the spring seats just in case you damage one of those too.
The first challenge is to support the front end of the bike as you will need to remove the front wheel and forks. I used a 15 ft. nylon ratchet tie-down strap rated at 2,000 lbs. I ran it over a tie rafter in the garage and under the frame just behind the steering yoke. I also used a strong rope as a safety line. You won't be able to move the bike once it's all apart, so don't hang it like this right next to your workbench! I placed the bike on the center stand, and then used the ratchet to help lift the front end off the ground. Since I was also replacing my steering head bearings, I removed the handle bars and strung them up with electrical wire to keep them out of the way. That allowed me to keep the levers and cables attached. It's not necessary to remove the bars to change the fork seals, but it helps to have them out of the way.
Next remove the speedometer cable from the front wheel, followed by the brake caliper. Don't let the caliper hang from the hose, tie it up with string. Remove the front wheel, and then the fender. Place a drain pan under one of the forks and remove the drain screw. Allow the oil to drain, compressing the forks slowly by hand to force as much of the oil out as you can. Repeat for the other fork and replace the drain screws. Remove both forks.
The spring seat at the top of the fork is held by a clip. In order to remove the clip you must push down on the seat against the spring pressure. I had a friend hold the fork tube upright in front of the workbench (rest it on a board or rug, not concrete so you don't scratch up the bottom of your fork) and placed a socket over the air nipple on the seat. Then using a length of 1"x2" board braced against the underside of the bench for leverage, he pushed down on the socket to hold the seat down while I removed the clip with a screwdriver and needle nose pliers. BE CAREFUL!! The spring will shoot out of the tube if you don't let it up slowly or if the board slips. DO NOT have your face anywhere near the top of the tube! Also be careful not to damage the o-ring on the bottom of the seat.
When you remove the spring, note which end is up - it makes a difference. Once you remove the spring, you need to use the fork tool above to remove the allen bolt at the bottom of the fork that holds the inner tube in. Then remove the inner tube. At the bottom of the inner tube is a tapered spindle which it rests on. Next remove the dust seal. Being careful not to damage the fork tube, remove the clip retaining the oil seal, and the oil seal itself. Try not to damage the seal, you can use it to press the new seal in place. I then took time to clean everything, using mineral spirits to clean out the old oil and crud inside the tubes.
Assembly
Be very careful not to damage the new seal when you put in in or all
your work will be for nothing. Apply oil to the seal before putting it
in - it helps putting it in and also helps to seal it. Push the seal
down evenly. I placed the old seal on top of the new and used the
end of a hammer handle to push down slowly. After you are sure the
seal is down all the way (all the way around!) put in the new retaining
clip. Put the dust seal on and carefully slide the tapered spindle and
inner tube in. Install and tighten the allen bolt, using the fork
tool again. Put the spring back in, making sure it's oriented the
same way it came out.
Fill both forks evenly with the correct amount of oil. I used a long piece of wire as a dipstick. Then replace the spring seat and clip. Here again my friend held it down with the board while I replaced the clip. Then reassemble the front end.
The whole job isn't very difficult. It helped to have a friend assist, especially with the spring seats. Take your time and you shouldn't have any problems!